I recommend carrying the tracked visitor ID into Stripe Checkout as client_reference_id and matching verified payment events to that visitor. Grosslytics decorates supported Payment Links automatically, while server-created Checkout Sessions need you to pass the identifier yourself. I would check renewals as well as the first payment before using the report to compare acquisition channels.
Key takeaways
- Use the same visitor ID on the tracked site and the payment; a UTM on the success page alone does not reconstruct the original journey.
- Payment Links use client_reference_id; server-created subscriptions also need metadata designed for later invoices.
- Configure snapshot webhook payloads and validate their actual API-version shape, including renewal metadata.
- Grosslytics estimates Stripe fees from its configured schedule; recorded payments are not normalized MRR or complete business net profit.
What do you need before connecting Stripe?
You need a tracked website, a Grosslytics site ID, a working Stripe checkout and a reachable attribution endpoint.
The examples follow Stripe’s documentation and the Grosslytics implementation. Before relying on them for live payments, run a test transaction and check the webhook payload you receive.
This workflow connects evidence from a visit to evidence from a payment. It cannot recover a referrer, campaign or search query that was never recorded, and a browser visitor ID is an attribution identifier rather than an authentication credential.
- Add your site using the setup flow.
- Set the site’s reporting currency to match your Stripe charges.
- Choose Payment Links or server-created Checkout Sessions.
- Identify the destination domain serving your Grosslytics API.
- Use Stripe test mode before changing the live integration.
See the tracker installation guide for Content Security Policy settings, domains and self-hosted API routing.
Step 1: How do you record the visit and carry its identity?
Install the tracker on the acquisition page, then keep the same visitor ID when the customer starts checkout.
<script defer src="https://grosslytics.com/g.js"
  data-site-id="YOUR_SITE_ID"></script>

<a href="https://buy.stripe.com/YOUR_PAYMENT_LINK">Subscribe</a>
Replace the placeholders and, for self-hosting, use your own tracker domain. Grosslytics appends client_reference_id to supported anchor links when that parameter is absent; an existing value is preserved, so inspect links that already use the field for another purpose.
For server-created checkouts, read the ID in the browser after the tracker has loaded and send it with your application’s checkout request:
// Browser: run from the checkout button after your page has loaded.
let visitorId = null;
try { visitorId = localStorage.getItem('gl_vid'); } catch {}

const response = await fetch('/api/checkout', {
  method: 'POST',
  headers: { 'content-type': 'application/json' },
  body: JSON.stringify({ visitorId })
});
if (!response.ok) throw new Error('Checkout could not be created.');
const { url } = await response.json();
window.location.assign(url);
If tracking is unavailable, let the customer purchase and accept that the payment may be unattributed. Choose prices and authorize the purchase on the server; do not treat browser-supplied analytics metadata as proof of who may buy what.
Step 2: How do you attach the ID to Stripe Checkout?
For Payment Links, inspect the decorated URL; for a server-created session, pass client_reference_id explicitly.
Stripe documents that the Payment Link reference reaches checkout.session.completed. That identifies the initial checkout; it does not by itself establish a visitor mapping on every future invoice. Source: Payment Link URL parameters.
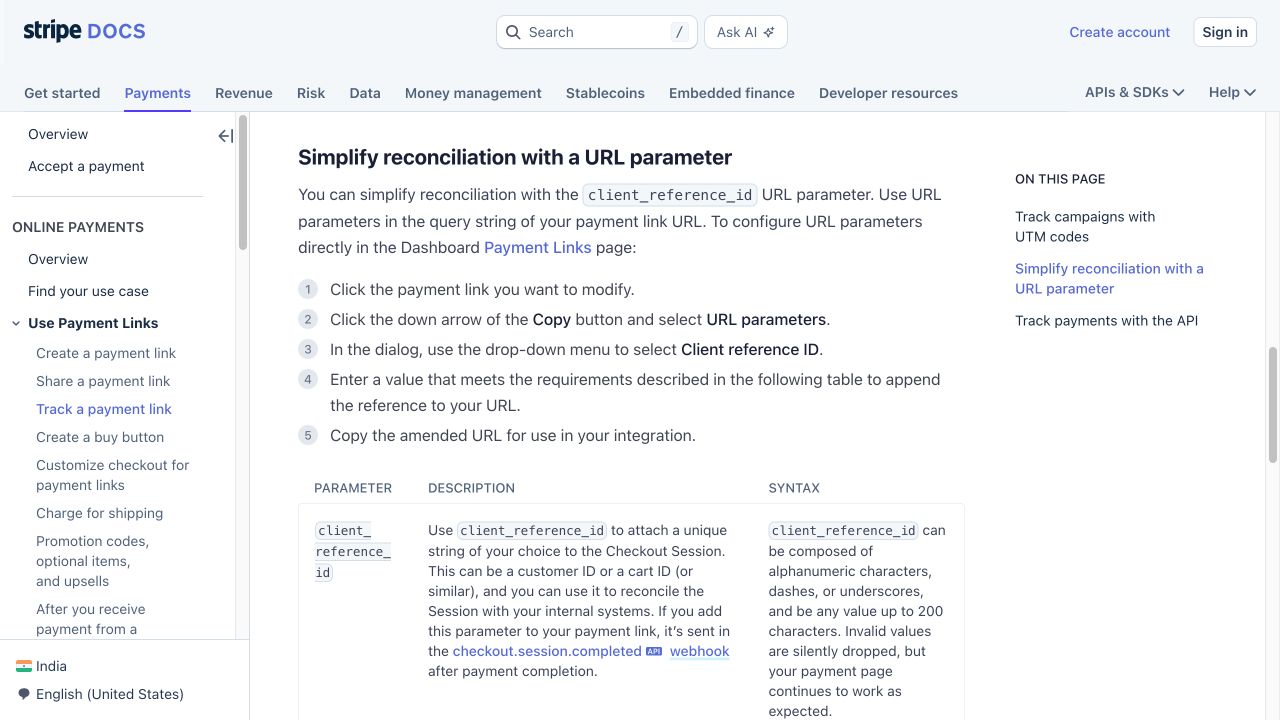
In your existing server checkout handler, with an initialized Stripe server SDK, a validated request body and a server-selected recurring price:
// Server only: inside your authenticated checkout route.
const visitorId = typeof body.visitorId === 'string'
  && /^[A-Za-z0-9_-]{1,200}$/.test(body.visitorId)
  ? body.visitorId : null;

const session = await stripe.checkout.sessions.create({
  mode: 'subscription',
  line_items: [{ price: process.env.STRIPE_RECURRING_PRICE_ID, quantity: 1 }],
  success_url: 'https://your-site.example/thanks?session_id={CHECKOUT_SESSION_ID}',
  cancel_url: 'https://your-site.example/pricing',
  ...(visitorId ? {
    client_reference_id: visitorId,
    metadata: { visitor_id: visitorId },
    subscription_data: { metadata: { visitor_id: visitorId } }
  } : {})
});
// Return session.url to the browser from your framework's response handler.
For a one-time price, use payment mode and omit subscription_data. Keep the API secret in your server environment. Source: Checkout Session creation.
Stripe’s current metadata documentation places subscription metadata on invoices under parent.subscription_details.metadata. The current Grosslytics invoice extractor reads invoice.metadata and the older subscription_details.metadata shape, so inspect actual renewal payloads before relying on direct metadata matching; a previously matched buyer email can provide a separate fallback. Source: metadata propagation.
Step 3: Which webhook events should you configure?
Send signed snapshot events to the Stripe webhook endpoint and save that destination’s signing secret in Grosslytics Payments settings.
https://YOUR_ANALYTICS_DOMAIN/api/webhooks/stripe?siteId=YOUR_SITE_ID
| Event | Current Grosslytics use | What to verify |
|---|---|---|
| checkout.session.completed | Records a checkout only when payment_status is paid | Visitor reference and initial payment amount |
| invoice.paid | Records invoice payments and marks subscription_cycle as renewal | Metadata shape, buyer matching and no duplicate initial charge |
| invoice_payment.paid | Connects invoice and PaymentIntent references | Correct association with the original invoice |
| charge.refunded | Applies supported full refunds | Full refund is reflected; partial refunds are not automatically deducted |
Stripe offers thin and snapshot event formats; Grosslytics’ current extractor expects the expanded data.object snapshot shape. Match the endpoint’s API version to the payload you have tested. Source: Stripe webhook configuration.
Delayed payment methods need additional attention: the current handler ignores unpaid Checkout completions and does not handle checkout.session.async_payment_succeeded. Do not treat an unhandled asynchronous payment as an attributed success.
How do you verify Stripe revenue attribution end to end?
Follow one tagged visit through payment and compare the source report with the provider’s event record.
Use a campaign URL such as:
https://your-site.example/blog/stripe-guide?utm_source=newsletter&utm_medium=email&utm_campaign=launch
Complete a test purchase in the same browser. Confirm one payment, the expected source, matching currency and the selected attribution model; then test a renewal and full refund separately.
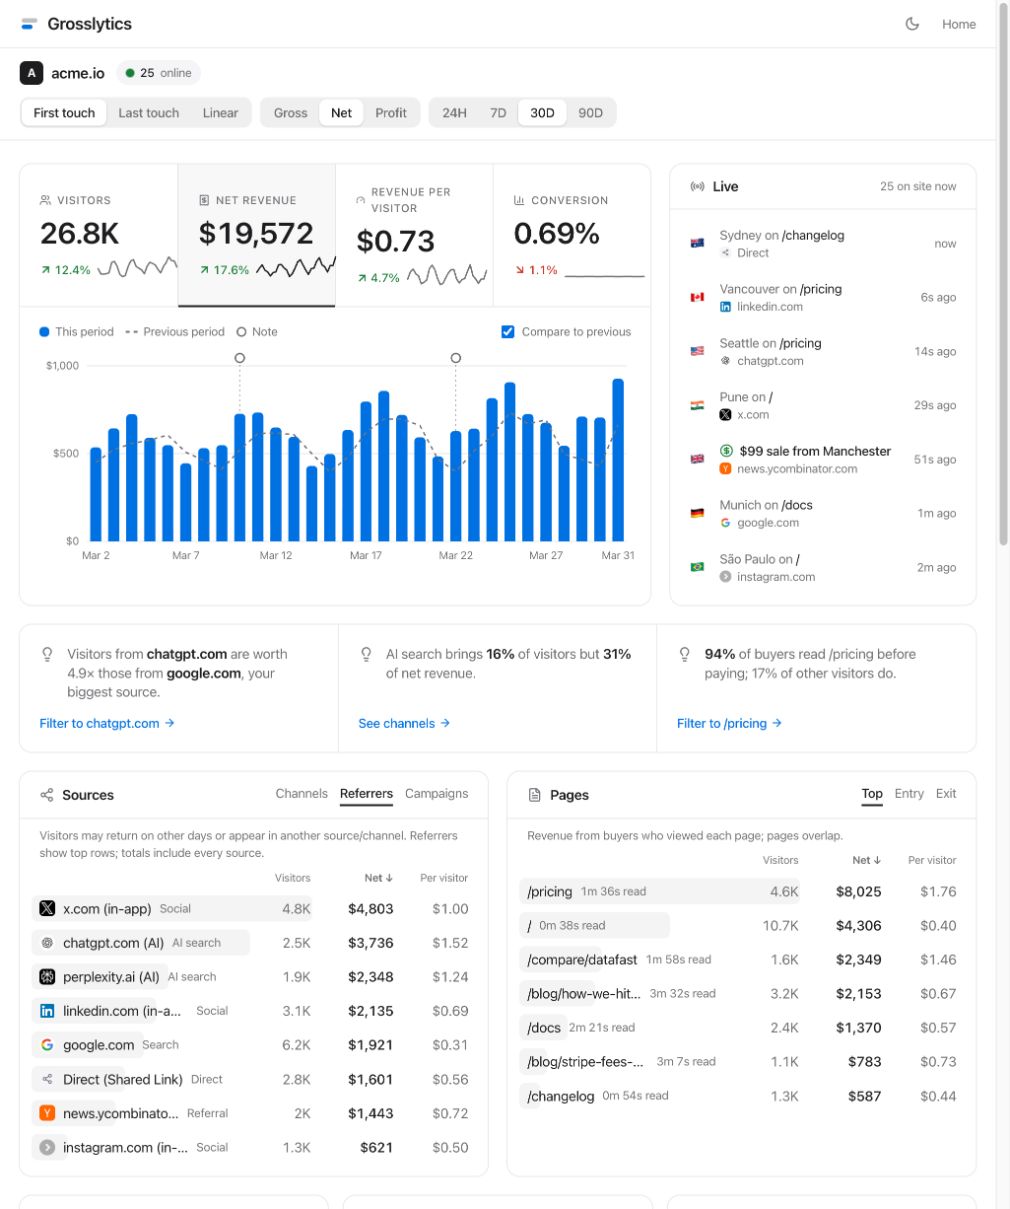
The dashboard definitions explain first touch, last touch and the 50/50 endpoint split. A page’s associated revenue is not an exclusive allocation across all pages, so do not add page rows together as if each payment belonged to exactly one page.
How should you interpret the Stripe fee deduction?
Treat the fee as an estimate from the configured schedule, then reconcile against actual Stripe settlement records.
The current Grosslytics default is 2.9% plus $0.30 in its USD-oriented fee schedule. For an illustrative $100 charge without tax, that produces $3.20 of estimated fees and $96.80 after fees.
estimated_fee = round(10000 * 290 / 10000) + 30 = 320 cents
net_after_estimated_fee = 10000 - 320 = 9680 cents
That default is not a universal Stripe rate: payment method, geography, currency, contract terms and extra charges can change the actual fee. The fixed minor-unit assumption also needs review outside USD, and the site’s reporting currency must match the payment because Grosslytics does not convert it.
Recorded subscription receipts are different from normalized MRR. The profit display additionally subtracts supplied ad spend, while excluding other operating costs.
What should you check when a payment is unattributed?
Check that the visitor existed before checkout and that the payment event carries an identifier the extractor can read.
- Confirm the tracker request succeeded on the acquisition page.
- Inspect the checkout reference without exposing API secrets.
- Check webhook signature verification and delivery status.
- Compare the actual invoice API version and metadata path.
- Check currency rejection and the payment’s amount/status.
- Test a fresh browser separately from a returning buyer.
Use the payment integration reference for the current endpoint fields. Next, reconcile one initial charge, renewal and full refund before enabling the workflow for live reporting.
Frequently asked questions
Does client_reference_id automatically track every renewal?
No. It links the Checkout Session. Later invoices require a usable metadata path or another supported buyer match; verify the actual Stripe API-version payload and a real test renewal.
Can I promise setup in three minutes?
No fixed time is established here. Pasting the tracker is short, but configuring checkout, webhooks and lifecycle validation depends on your application.
Does Grosslytics read my exact Stripe processing fee?
The current Stripe integration calculates an estimate using its configured fee schedule. Reconcile it with actual provider fees, particularly outside the USD domestic-card example.
Are all Stripe payment methods covered by these events?
No. Delayed payment methods can complete asynchronously, and the current Grosslytics handler does not process checkout.session.async_payment_succeeded. Test method-specific behavior before relying on the report.