I recommend starting a self-hosted Grosslytics deployment by checking the whole Cloudflare stack, not just Worker requests. You can use the source-build setup or a prebuilt release; Workers, D1, Queues and Durable Objects all have allowances that affect the cost. I’ll walk you through sizing, deployment and checking that visits and payments connect.
Key takeaways
- A free-tier infrastructure bill depends on all service limits, including the 500 MB limit for the deployment’s D1 database.
- Install the prebuilt free release with
npx grosslytics@latest install --free, or build from source withbun run setup. - Queues can become the first limit: 10,000 free operations/day allow about 3,333 normal small messages before retries and other usage.
- Validate browser events, queue persistence and signed test payments separately.
Cloudflare’s allowances below were checked on November 21, 2026. Compare the limits with your own workload before deploying.
Step 1: Check whether your workload fits the free plan
A $0 Cloudflare infrastructure bill is possible only while the entire deployment stays inside the applicable free allowances. The current stack uses a tracker, two Workers, D1, Queues and a SQLite-backed Durable Object for live presence.
| Component | Free allowance relevant to this setup | What to measure |
|---|---|---|
| Workers | 100,000 requests/day; 10 ms CPU time per invocation | API requests, dashboard execution and CPU usage across the account |
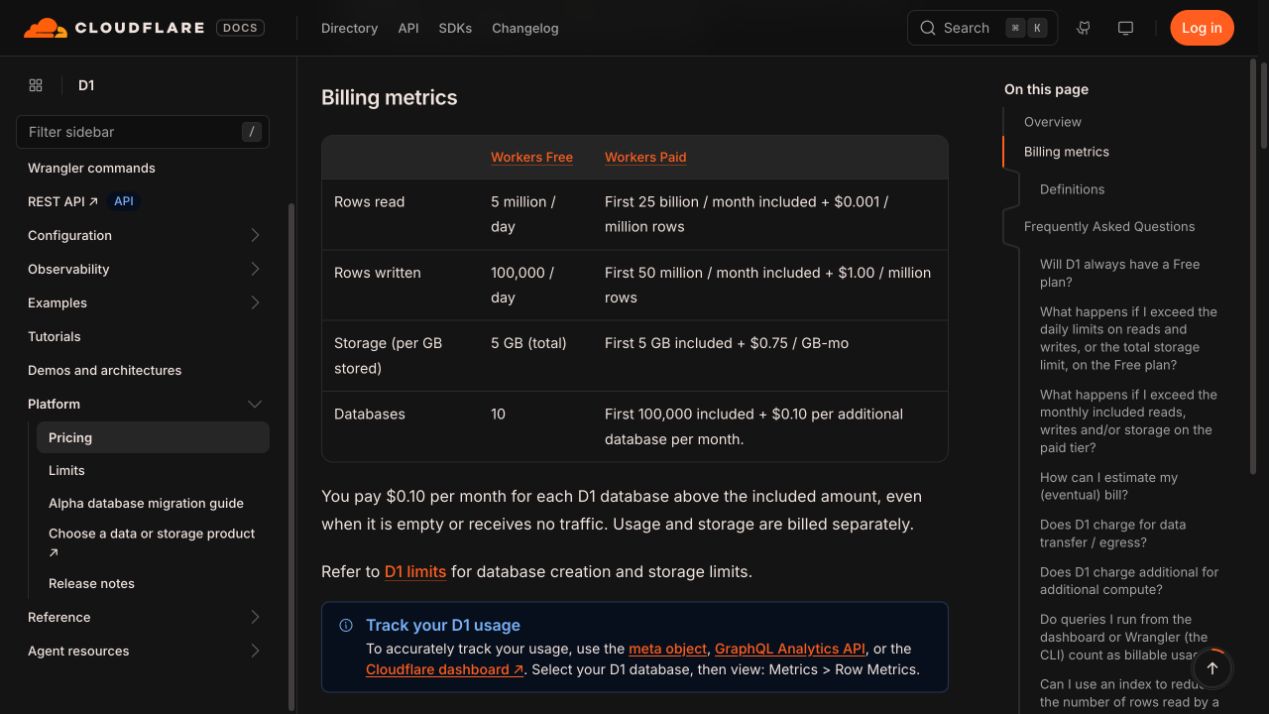
| D1 | 5 million rows read/day and 100,000 rows written/day. Storage caps are 500 MB per database and 5 GB per account | Query scans, writes including indexes, and the size of grosslytics-db |
| Queues | 10,000 standard operations/day | Each message’s write, read and delete operations, plus retries |
| Durable Objects | 100,000 requests/day and 13,000 GB-s/day of duration; separate storage allowances | Presence updates, WebSockets, alarms, duration and storage |
These are distinct meters, not interchangeable event allowances. Other applications on your account consume the same account-level budgets. Check the current Workers pricing, D1 pricing, Queues pricing and Durable Objects pricing before deployment.
D1 counts the rows a query scans. Indexes can reduce reads but add writes. A Free plan query also fails once you exhaust the relevant daily allowance. Grosslytics stores its events and payments in one database, so use the 500 MB per-database limit when planning capacity for that installation. A domain, optional license and your operating time are separate costs.
Work through an event budget before counting pageviews
The collector sends one queue message per accepted analytics event when its queue binding is present. A normal message under 64 KB typically uses three operations: write, read and delete. Batching does not remove per-message operation charges.
For an illustrative 2,000 accepted events/day:
Queue operations = 2,000 messages × 3 operations = 6,000/day
Remaining queue allowance = 10,000 − 6,000 = 4,000/day
Idealized queue ceiling = floor(10,000 ÷ 3) = 3,333 messages/day
This calculation excludes retries, dead-letter writes, larger messages and other queues. Use this as a starting estimate for sizing your workload. Pageviews, engagement updates and custom goals can each create events, so 2,000 events does not mean 2,000 visitors or pageviews. D1 writes and dashboard queries can reach their own limits first.
Step 2: Prepare your account, hostname and install path
Use a Cloudflare account that owns your domain, an unused hostname such as analytics.example.com, and a current supported Node.js release. The CLI requires Node.js 22.12 or newer. Source builds require Node.js 22.23.4 or newer, Git and Bun. The current installer uses macOS/Linux commands; check compatibility before installing on Windows.
For a new Cloudflare account, open Workers & Pages once to initialize its workers.dev subdomain. Use a hostname with no existing A, AAAA or CNAME record; the custom-domain setup needs to attach that hostname. Choose the correct account when prompted.
Step 3: Deploy the API, dashboard and database together
Install the prebuilt free release from a dedicated directory:
npx grosslytics@latest install --free
Register the tracked website and verify the “Powered by Grosslytics” credit in its homepage footer. Use npx grosslytics@latest install --lifetime with a Lifetime license. For a custom build, follow the source installation instructions.
Run npx grosslytics@latest update from the same directory for new releases. The dashboard and tracker update at their existing URLs.
The installer asks for your hostname, Cloudflare zone and dashboard password, then authenticates with Cloudflare as needed. It creates grosslytics-db, the ingest and dead-letter queues, applies the schema, deploys the API and web Workers, and sets the API token and owner password. Allow time for the download, authorization and domain activation.
Keep both Workers on the analytics hostname: analytics.example.com/api/* must reach the API, while the web Worker serves the dashboard and tracker. The tracker normally sends events to the origin serving its script. Splitting those origins without configuring routing can produce a dashboard that loads but receives no visits. The setup documentation covers the standard arrangement.
Save the printed API token in a password manager. Keep the generated grosslytics-install folder private: its state contains installation details, including the license when used, and re-running from that folder targets the same installation. Worker names are fixed; the current installer rejects a different hostname when it detects an existing Grosslytics deployment in that account.
Step 4: Add your site and install the tracker
Open https://analytics.example.com/app, sign in with the owner password and add the domain you want to measure. Choose its reporting currency and copy the generated site ID and tracker snippet.
For the standard same-origin deployment, the tag looks like this:
<script
  defer
  src="https://analytics.example.com/g.js"
  data-site-id="YOUR_SITE_ID"
></script>
Replace both placeholders with your real analytics hostname and site ID. Install the tag in the pages you want measured, then open a tagged URL such as https://www.example.com/?utm_source=setup-check&utm_medium=referral in an ordinary browser. The tracker skips WebDriver browsers, so an automated browser session alone is not proof that collection is broken.
Use the browser’s Network panel to check that g.js loads and that /api/event receives a successful response. If your site uses Content Security Policy, add the analytics origin to the relevant script-src and connect-src directives while preserving the rest of your policy. Follow the tracker installation instructions.
A 202 Accepted means the collector responded. Some filtered events also get a 202, and enqueueing runs asynchronously. Check the stored Sources report for setup-check before treating the visit as recorded.
| What you see | What to check |
|---|---|
g.js fails to load or there is no /api/event request |
Confirm the script URL, site ID and browser console errors, including CSP. |
/api/event returns 403 or 404 |
Confirm the tracked origin and site ID, then verify that /api/* reaches the API Worker. |
/api/event returns 202, but the tagged visit is missing |
Check the API Worker’s logs for failed queue sends. If the message arrived, inspect the ingest queue’s backlog and retries, the dead-letter queue and D1 write errors. |
In local repository tests on November 21, 2026, eligible visits reached the queue stub, and filtered bot requests returned 202 without queuing an event. A separate ingestion test replayed a 100-message batch without duplicating stored events and retried an injected write failure. These tests used local fixtures. Use the Cloudflare dashboard and your own tagged visit to verify your deployed pipeline.
Step 5: Connect a payment provider and verify the complete journey
Self-hosted web analytics becomes revenue attribution only after a payment is connected to the visitor who generated it. In the dashboard’s Payments settings, configure the provider and its webhook signing secret. The endpoint follows this pattern:
https://analytics.example.com/api/webhooks/PROVIDER?siteId=YOUR_SITE_ID
Use your provider’s exact event names and metadata mapping. For Stripe Checkout and Payment Links, follow the Stripe revenue attribution guide; for another gateway, use the Polar and Dodo setup or Paddle transaction guide. These explain identity propagation, renewal behavior and reporting limitations separately from hosting.
Run a provider-supported test purchase using a browser visit with a known UTM. Verify the signed webhook response, the stored payment amount and currency, and the attributed source. Test renewal and refund behavior you depend on rather than assuming support from a dashboard label. Each site has one reporting currency; the current implementation rejects new payments in another currency instead of converting them.
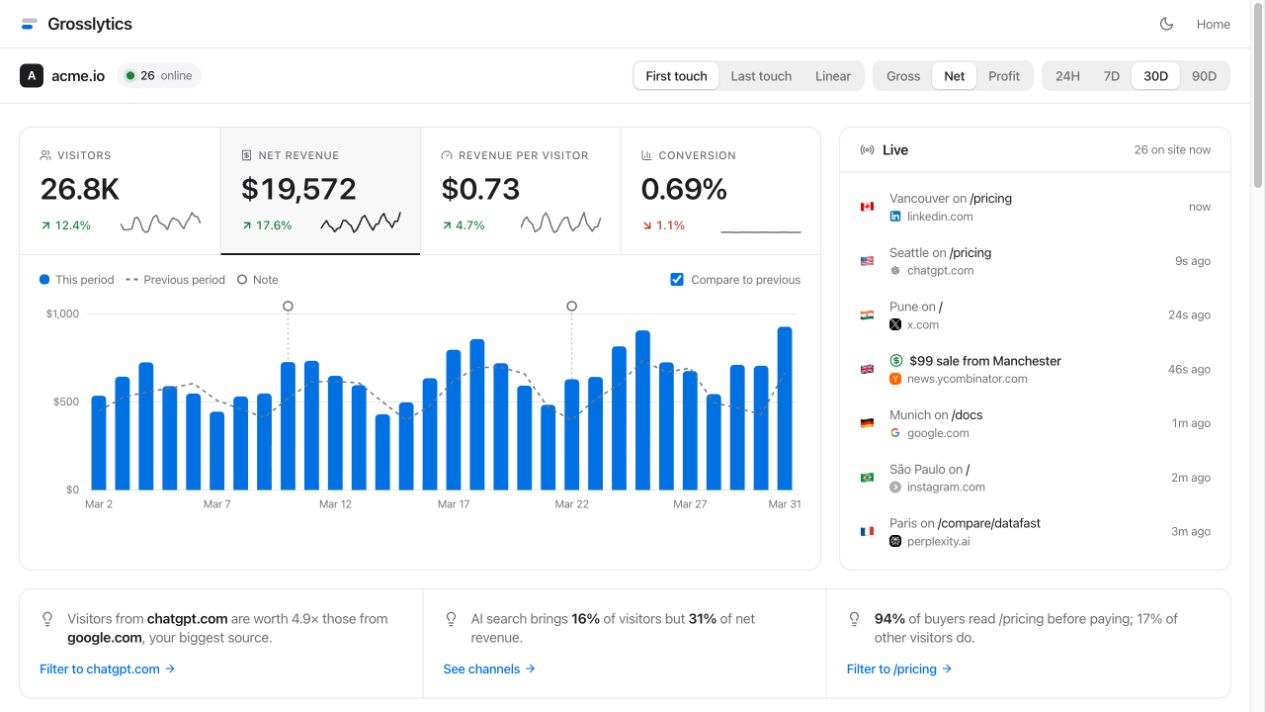
Before using the numbers for decisions, check:
- A real browser visit reaches the live panel and the stored reports.
- A signed test payment appears once and credits the expected source.
- Reloading a report does not produce an unexpected D1 scan spike.
- Queue processing succeeds and the dead-letter queue is monitored.
- The private dashboard requires authentication and retains its noindex protections.
Use your own dashboard to confirm that the test payment arrived.
What should you monitor after installation?
Monitor Worker requests and CPU, D1 reads/writes and storage, queue operations and failures, and Durable Object usage together. In Cloudflare’s D1 dashboard, inspect Metrics → Row Metrics; query metadata also exposes rows_read and rows_written.
Grosslytics currently queries raw events for dashboard reports, so repeated long-range reports can become expensive as data grows. Measure a representative traffic day and the reporting queries you actually use before projecting capacity. Keep backup/export and restore procedures for the database, and plan retention before storage becomes a blocker.
To update a source install, rerun the source setup from its existing checkout. For a packaged install, rerun npx grosslytics@latest install from the same working folder. Back up first and review release and migration changes. Self-hosting gives you control of the Cloudflare account and database, while Cloudflare remains the infrastructure provider; it is not a guarantee of exclusive physical storage, legal compliance or automatic recovery.
If the workload outgrows free allowances, evaluate the current paid plan and usage rates rather than treating $0 as a permanent ceiling. The Workers Paid plan starts at $5/month before additional usage. Start with the real event and query metrics from your own installation, then decide whether to optimize, upgrade, or use a managed analytics option.
Frequently asked questions
Is Cloudflare D1 enough for self-hosted web analytics?
D1 provides the database. Grosslytics also uses Worker APIs, Queues and a SQLite-backed Durable Object, plus a dashboard and tracker. Plan and monitor the complete stack.
Can this run with no monthly server bill?
It can have a $0 Cloudflare usage bill on the Free plan while every relevant allowance is respected. A domain and optional license are separate costs, and limits can stop operations. Your available capacity depends on how your site uses each service.
Can I deploy by running only npx grosslytics@latest?
The current CLI requires the install subcommand. The packaged path also needs a valid license and an available release; source setup requires repository access and build tools.